How Can We Help?
Search for answers or browse our knowledge base.
AccountManager Configurable Reports
Purpose:
To examine the uses for, options in, and examples of AccountManager’s Configurable Exports
Prerequisites:
- AccountReporter license
- Working knowledge of basic reporting functions and features.
Uses for Configurable Exports
- Detailed reports “beyond the standard templates.”
- Mimic principals’required reports (i.e., take their provided spreadsheet and “recreate it”in a Configurable Export).
- Customized reports for internal use (i.e., “Which opportunities have line items marked as “Won”but have not yet been copied into a Design Win?”
Options When Creating Export Profiles

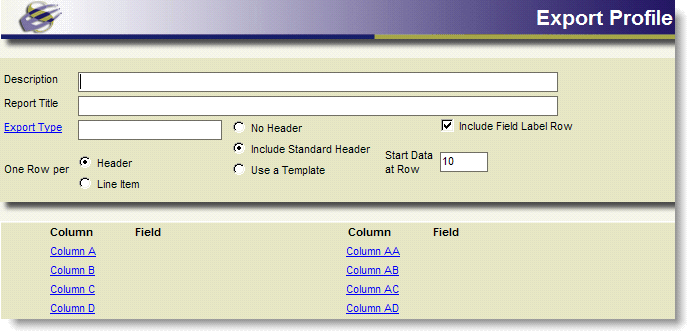
- “Description”: Describe what this report will be used for. Helpful if multiple users in your organization have reporting licenses. This information will not display on the report.
- “Report Title”: This will display on the report.
- “Export Type”: Choose this first when creating a new export profile. Any report can only pull one “kind”of document (i.e. Opportunities, Direct Quotes, or Accounts).
- “One Row per”: (The examples below are based on “Opportunity”type exports, but rules apply to all BizDoc exports –Quotes, Samples, etc.)
- “Header”–An opportunity with 4 line items would still display on one row.
- All four part numbers will be combined in the field “Mfr Part Numbers”.
- All field choices would have to be relevant to the “header”of the document, and not “line item”specific (so no “ASP”or “Qty”). Totals would have to pertain to the whole document (i.e. “Oppty Value”).
- Do not use any field choices ending with “(LI)”
- Example of “Header”export:
- “Header”–An opportunity with 4 line items would still display on one row.

- “Line Item”–The same opportunity with 4 line items would display on four separate rows, one for each line item.
- Some header-type information could still appear on each row, but you can include line item specific data like ASP, Qty/Unit and Line Total.
- “OK”to choose line item specific field choices such as “Mfr Part Number (LI)”
- Documents without any line items will not even display on this report! **This is key. The below opportunity is just a header only (note: no “+”next to it, to expand and see line items). Because the number of line items on this opportunity is zero, that’s how many rows it will be represented with on your “line item”export…zero

-
- Example of “Line Item”export:

- “No Header”: Report is blank on top.
- “Include Standard Header”: Report will display company’s logo will in upper left corner (if installed), and company address/phone information in upper right corner.
- “Use a Template”: Report will populate a previously-attached template (.xlt file). Remember to specify if the report should include field label rows and on which row to “start data.”
- “Include Field Label Row”: Checked means the default field labels will display on the row above the data. Unchecked means no field labels will display (best unchecked when using a “template”that already has column labels included).
- “Data Start Row”: Specify the row on which the first bit of data should display. Default is 諺”however sometimes you may wish to change this, especially when using templates.
- “Column”choices: Available choices vary depending on “Export Type”. For example, “Opportunity Value”is not an available choice if “Export Type”is “Account.
Examples of Configurable Exports
- Contact or Account lists with the exact information you want displayed
- Internal “Housekeeping”ideas…
- Quote (or Sample, RFQ, etc) reports that show whether they are linked to an Opportunity
- Oppty Reports that show Won/Lost status and whether a DesignWin has been created
- Report on Design/Purchasing/Manufacturing locations on Opportunities
- Recreate Principals required reports and stop emailing the spreadsheet around for updates
- Create a “template”(.xlt) of their form, and a corresponding Export Profile
- Have everyone update their Oppty’s in AM and run the report only once!
Tips & Tricks
1. Use “Templates”to compensate for repetitive actions
-
- If you always have to “fix”certain columns
- If you need to add drop-down filtering
- If you like to move header info further to the right
- If you just prefer different “colors”!
2. Copy/Paste one profile to create another. Then change the couple of fields necessary (i.e. if you wanted to create the same opportunity export for more than one principal, and you want to use a “template”with that manufacturer’s name on it).
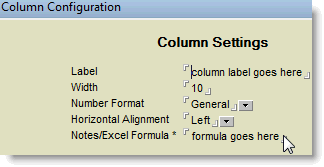
3. Edit “column labels”as needed
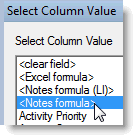
4. Use a Notes Formula to add your own fields that aren’t already available in the picklist, or even create your own field combinations.

-
- After selecting Notes Formula for the column, click on the words to fill in the formula:


5. Finding the field names for Notes Formulas:
-
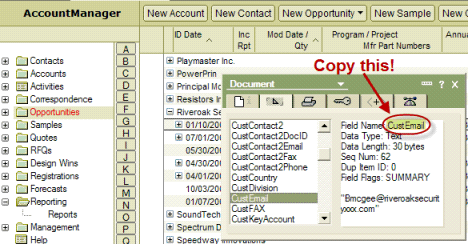
- Rightclick on a document of the type you’re reporting on, and go to “Document properties”
- The second tab contains the Field List.

-
- Copy that text and place it in the spot that says “formula goes here”. If that’ the only info you need, you’re done. If you need to string multiple fields together, here are some commonly requested Notes Formulas (you can copy and paste these directly in the area that says “formula goes here”)
- Created date (without time): @Date(DateCreated)
- Last modified date (without time): @Date(DateModified)
- Contact’s full name in one cell, last name first (Contact export): @text(LastName) + ” ” + @text(FirstName)
- Full customer address in one cell (Oppty export): @text(CustAddress1) + @newline + @text(CustCity) + ” ” + @text(CustState) + ” ” + @text(CustZip)
- Is document linked to an Opportunity? (BizDoc exports, except Opptys): @if(LinkedDocID=””;”No”;”Yes”)
- Current Reporting Status –without the name/datestamp (Oppty exports): @if(@Length(@Right( CurrentStatus ; “:” )) = 0;CurrentStatus;@Right( CurrentStatus ; “:” ))
- Current Reporting Status –without the name, but with the datestamp (Oppty exports): @if(@Length(@Right( CurrentStatus ; “:” )) = 0;@text(@date(CurrentStatusDate)) + “: ” + CurrentStatus;@text(@date(CurrentStatusDate)) + “: ” + @Right( CurrentStatus ; “:” ))
- Copy that text and place it in the spot that says “formula goes here”. If that’ the only info you need, you’re done. If you need to string multiple fields together, here are some commonly requested Notes Formulas (you can copy and paste these directly in the area that says “formula goes here”)
