Search for answers or browse our knowledge base.
Principal CRM Update Feature: Configuration & Profile Setup
Purpose: This document explains how to configure and set up the Principal CRM Update feature in AccountManager. Once the initial setup and profiles are complete, please refer to this document for ongoing usage of the feature: https://help.empoweringsystems.com/knowledge-base/principal-crm-update-feature-using-the-principal-crm-dashboard/
Background: The idea behind the Principal CRM Update feature is to help representatives quickly and easily update the CRM systems (other than AccountManager) that they’re required to use by their principals. The feature is designed with the idea that the responsibility for updating the principals’ systems can be centralized with one or two users within the rep firm. This allows the majority of the sales team to streamline all of their activity and updates into AccountManager. This is beneficial for salespeople because they only need to learn AccountManager rather than multiple different CRM applications, and as a result, they are able to enter all of their opportunities and updates more quickly and completely than if they needed to log into multiple applications to do so. Rep firm owners and management also benefit because all of their company’s updates are consolidated within AccountManager, which is owned by them. If the relationship between the rep firm and the principal is severed, rep firms are often locked out of principal CRM systems immediately, and no longer have access to the opportunities and sales data they in fact generated over the past months and years.
Prerequisites:
Contact ESI Support to identify which few users will have access to the CRM Update Dashboard. These users must have:
- access to “all data” in AccountManager, regardless of account assignments
Creating Principal Update Profiles & Layouts:
- Open the principal account profile you wish to create a profile for.
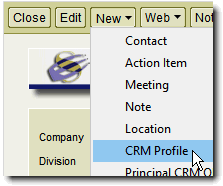
- Click on “New > CRM Profile” in the action bar.
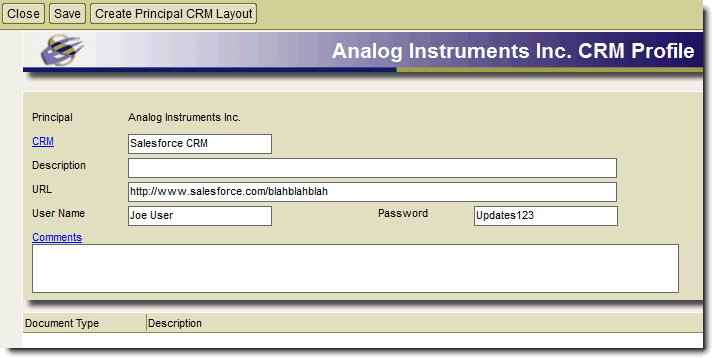
3. Choose the CRM type from the dropdown menu (currently, “Salesforce CRM” or “Other”). The remainder of the information is optional, not required, and is merely to save the information for convenience sake, at this point. Click “Save” at the top.
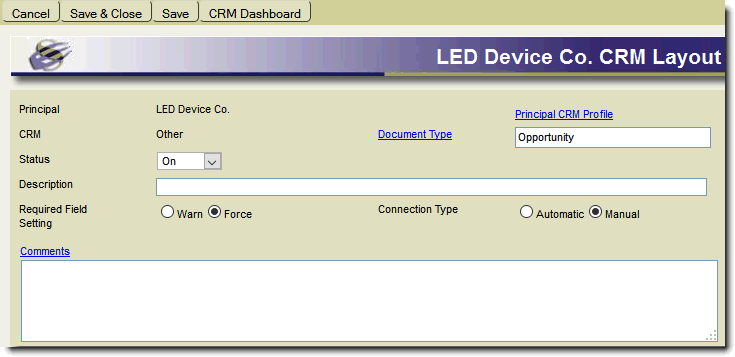
4. Next, click the “Create Principal CRM Layout” button. This will open the Layout screen on which you’ll map your fields. Choose “Opportunity” for the Document Type, and whether any required fields will be enforced with a “Warning” or “Forced”. If you choose “Warn” and users leave a required field blank, they’ll be warned that it is a required field when they try to save the opportunity. If you choose “Force”, users will not be able to save the opportunity at all, until they have populated each of the “Required” fields. It is not recommended that you make every field “Required” as that can become frustrating for users trying to make quick updates, so use sparingly and appropriately where it really matters. Also, be sure to change the Status dropdown to “On” and set Connection Type to “Manual” if it isn’t already set as such. Click “Save” once finished filling out the top of this layout.
5. Now it’s time to populate the fields you want to track. On the lower portion of the screen, you should see tabs for Document Settings and Line Item Settings. Information typically found on the header of opportunities will be on the Document Settings tab, and information typically found on the line items will be on the Line Item Settings tab. (TIP: You may want to have this principal’s CRM system open on one side of your screen, and this profile open on the other, so that you can map the fields on the profile in a similar order to the way they display in the principal’s CRM system. This will make moving your updates from AccountManager to the CRM system much faster). Click the “Add” button to choose your first field5

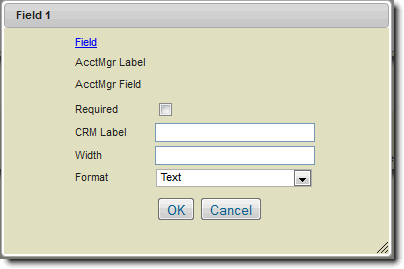
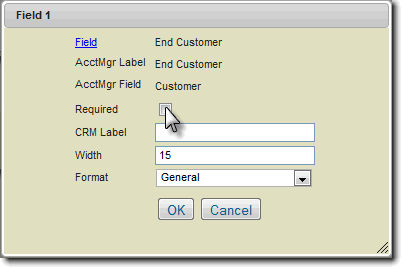
In this pop-up box, click the “Field” button and choose the desired field from the list. As you can see in the screenshots below, that will populate many of the fields you see in this popup box.
- Use the “Required” checkbox to either indicate this field should be filled in on every opportunity (this setting also applies to users working in AccountManager Mobile).
- The “CRM Label” can be filled in if you want to remind yourself what this field in AccountManager equates to in the Principal’s CRM system. For example, in AM we have “Annual Units” on an opportunity profile, but your principal might call that “Production Qty” or “Volume” in their system. You could put their label in here, so that it’s clearer when you’re making your updates, what information goes where.
- The Width will fill in with a typical default, but you can expand it if you’d like to make certain areas wider on your update screen, such as the Current Reporting Status or another field that has the potential to hold a lot of text.
- (The “Format” field should already have the correct format in it).

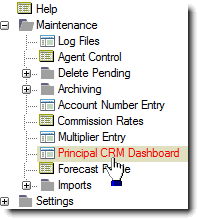
6. When finished populating the fields you’ll be monitoring, Save and Close the Layout and Profile screens. You can view the CRM Profiles from inside a Principal account profile by going to “View > CRM Profiles” and looking in the embedded view below. Layouts are visible in the “Maintenance > Principal CRM Dashboard” view in the outline.

7. To learn how to use this feature for updating your principals’ systems, please continue on to this document: http://support.empoweringsystems.com/web/ESI/support/library.nsf/pages/PrincipalCRMUpdateUsage
