Search for answers or browse our knowledge base.
Principal CRM Update Feature: Using the Principal CRM Dashboard
Purpose: This document explains how to use the Principal CRM Update feature in AccountManager for updating principals’ CRM applications other than AccountManager. For initial setup and configuration instructions, please refer to this document first: http://support.empoweringsystems.com/web/ESI/support/library.nsf/pages/PrincipalCRMUpdateSetup
Background: The idea behind the Principal CRM Update feature is to help representatives quickly and easily update the CRM systems (other than AccountManager) that they’re required to use by their principals. The feature is designed with the idea that the responsibility for updating the principals’ systems can be centralized with one or two users within the rep firm. This allows the majority of the sales team to streamline all of their activity and updates into AccountManager. This is beneficial for salespeople because they only need to learn AccountManager rather than multiple different CRM applications, and as a result, they are able to enter all of their opportunities and updates more quickly and completely than if they needed to log into multiple applications to do so. Rep firm owners and management also benefit because all of their company’s updates are consolidated within AccountManager, which is owned by them. If the relationship between the rep firm and the principal is severed, rep firms are often locked out of principal CRM systems immediately, and no longer have access to the opportunities and sales data they in fact generated over the past months and years.
Prerequisites: Please refer to the Prerequisites mentioned in the coordinating document for all system and user requirements, as well as how to configure an update Profile and Layout for each principal you’ll be using this feature for.
Using the CRM Dashboard for Updating:
- Open AccountManager and go to Maintenance > Principal CRM Dashboard. (this will open the dashboard in your web browser) Or open AccountManager Web and click on “CRM Dashboard”
- Choose the Principal for whom you’re about to enter updates and doubleclick to open their profile.
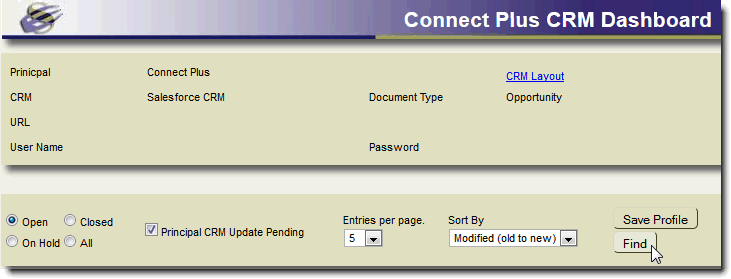
- Use the selection criteria to determine what kinds of results you’d like to have displayed, then click the “Find” button.
- “Open/Closed/OnHold/All” refers to the Status of the opportunity.
- “Principal CRM Update Pending” if checked, will yield only opportunities that have been modified since the last time the Principal CRM was updated.
- “Entries per page” and “Sort By” simply determine how the resulting opportunities are displayed to you.

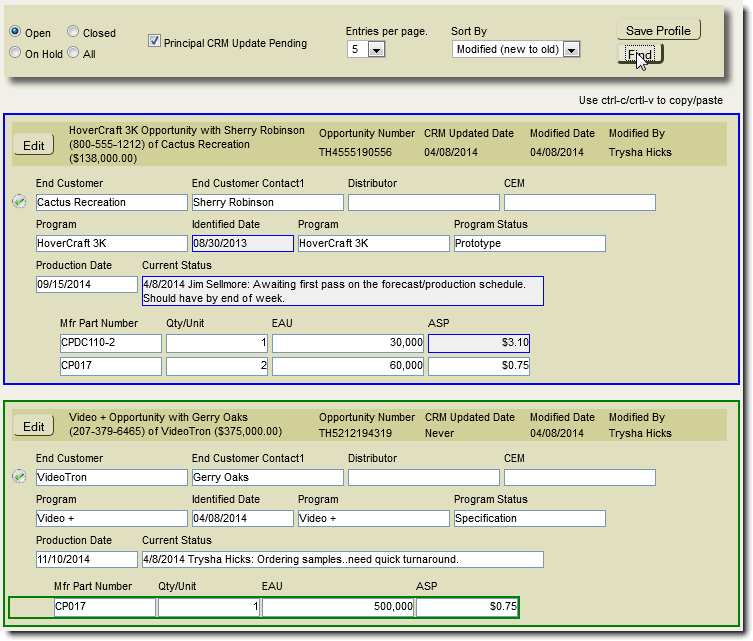
4. Opportunities meeting the criteria you specified will display below.
- A green outline indicates a new opportunity or line item since the last time the principal’s CRM was updated.
- A blue outline or shading indicates information that has been changed since the last time the principal’s CRM was updated.

5. At this point, it’s helpful if you can have the CRM Dashboard on one side of your screen, and the principal’s system on the other side, so that it’s quick and easy to bounce between screens to make your updates. (Note: If you make the Dashboard window narrower and some of your information is now cut off on the righthand side, just click the “Find” button again, and the display will adjust to the width you now have available.


6. For blue fields, simply select, copy and paste the information from AccountManager into the principal’s CRM system. (Our development team plans to automate this further in the future, but for now, use the keyboard shortcuts of Ctrl+C and Ctrl+V to copy and paste). You only need to update the fields shaded in blue, because the other fields have not changed since the last time you updated this principal’s CRM system. In the example above, only the Identified Date, Current Status, and the ASP of one part number needs to be updated in the principal’s CRM.
7. For green opportunities and line items, create a whole opportunity as necessary in your principal’s CRM system, copying and pasting over all the information from AM. Next time you do an update (after this session), this opportunity will not be represented in green, but only it’s changes maybe be highlighted in blue.
8. Each time you finish updating an opportunity, you can click the green checkmark button to remove that opportunity from the view. This is helpful when you have many opportunities that need updating, and wish to remove the ones you’ve finished.

Alternately, you could leave them all visible until you’re completely finished and just use the “Mark all Updated” button in the top left corner of the screen to close out all the opportunities at once. This step is important because this is what tells AccountManager when you updated the Principal CRM so that next time, it only gives you results entered or edited after this date and time. If you just Close the dashboard screen without completing this step, these exact same changes will still be presented to you next time.
9. When you have no opportunities left on your screen to update, you can close the dashboard. You’re done!
