Search for answers or browse our knowledge base.
Using AccountReporter Configurable Exports with Constant Contact
Purpose:
This document outlines the steps for using an AccountManager Configurable Export to prepare a list of Contacts for importing into Constant Contact.
Background:
Constant Contact is just one example of a variety of online email marketing systems. For more information, ideas and “best practices” for using AccountManager to help you with your email marketing campaigns, click here.
Prerequisites:
- AccountManager 4.0 or greater
- AccountReporter license
- Constant Contact account (see www.constantcontact.com for more information)
Exporting the Contacts from AccountManager
The recommended method for extracting your AccountManager (AM) Contacts is to use a Configurable Export Profile. If you are comfortable creating and using Configurable Exports, follow the parameters below to create your profile. (For additional details on AM Configurable Exports in general, please click here).
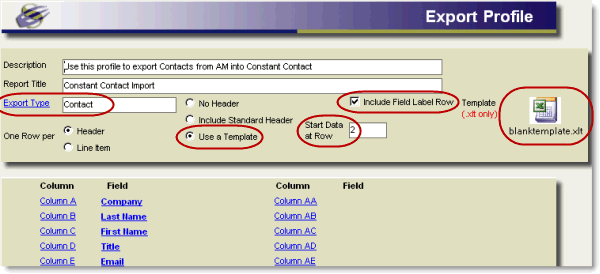
1. Create a Configurable Export Profile with the following parameters set:
-
- Export Type: Contact
- Use a Template
- Include Field Lable Row
- Start Data at Row: 2
- Minimum column settings of: Company, Last Name, First Name, Email (You may include other fields if you’d like, and they can be in a different order.)
- Attach your Microsoft Excel template. (Instructions below)

2. Create and Attach your Excel Template
Constant Contact does not currently (as of Dec. 2009) accept imports from Microsoft Excel 2007, and can also have issues with certain types of formatting in Excel workbooks. A good workaround is to make sure your Contact lists are always in a plain, basic Excel 2003 workbook. Attaching an Excel Template (.xlt) to your Configurable Export Profile ensures that the output will be formatted in such a way that it’s easily accepted into Constant Contact. Attaching the template to your export profile also means you don’t need to worry about these formatting issues each time you run the report, because setting the template once will take care of it for you on all the future exports.
- Open Microsoft Excel and to a blank/new workbook
- Do not make any changes at all to the workbook–just leave it blank.

- Save the blank workbook. When prompted for the file name, follow these steps:
- Click the dropdown next to “Save as type:”
- Excel 2003 Users: Choose “Excel Template (*.xlt)
- Excel 2007 Users: Choose “Excel 97-2003 Template (*.xlt)”

- Make sure “Save in” says Desktop or My Documents (something easy to find). Once you chose Excel Template above, the file path will likely have been changed to a default templates directory that’s not as easily located later. You’ll only need this file for a few moments, so Desktop is a great temporary location).

- Name the file whatever you’d like–perhaps BlankTemplate.xlt
- Attach your new .xlt file to the Configurable Export Profile in AccountManager. If you’re in edit mode, you should see two little brackets on the export profile. Click once to position your cursor there, then use File > Attach to browse for your new .xlt file. Once you’ve attached the .xlt file to the configurable export profile, you can delete the file from your Desktop.

3. Save the Export Profile and Run your Export
-
- Assuming you entered your column choices in Step 1 above (Company, Last Name, etc), you can “Save” the export profile now and then run your report.
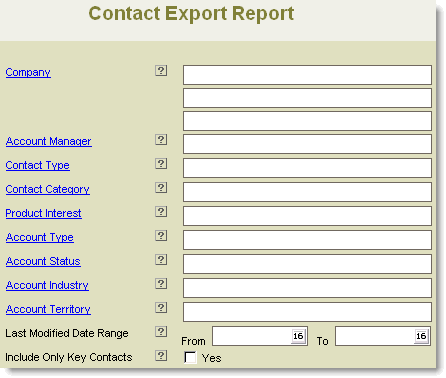
- Note: The Selection Criteria screen on Contact exports does allow you to narrow your results by a many different criteria, depending on which fields your organization is taking advantage of when managing Contacts and Accounts in AccountManager. This means you could really target your audience by exporting contacts that are of a particular Account Type (i.e. End Customer), within a certain Industry, and with a certain Product Interest.

-
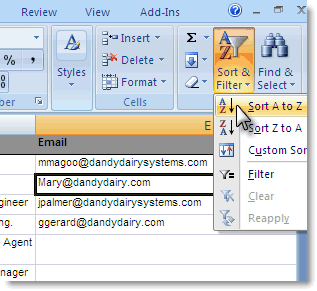
- Once your data in is Microsoft Excel, sort by the email address column, so any contacts without email addresses will be grouped together. Select those rows and delete the contacts (since without email addresses, you cannot use Constant Contact to send them any information).
-
Save your resulting report. (Note: Excel 2007 users need to make sure they save as an Excel 97-2003 format (*.xls) since Constant Contact cannot accept Excel 2007 (*.xlsx) files yet).

Import Contacts into Constant Contact
(Note: Empowering Systems is not affiliated or partnered with Constant Contact, so the instructions, steps and capabilities noted below are subject to change at any time)
- Log into your Constant Contact account, and go to the “Home” screen.
- Click on ‘Add/Import Contacts”
- Select (or Create) the List you’ll be importing to, and click “Next”
- When prompted for how you’d like to add to your list, choose “Import my list from a file on my computer” and click “Next”
- Click the “Browse” button to select the file you just saved (after running your Contact configurable export) and click “Submit Data” (Note: At this point, you will likely have to check some boxes agreeing to Constant Contact’s terms and conditions)
- The next screen should ask how you’d like to label your data. Some of the columns should be labeled appropriately already if Constant Contact recognized the column labels on your spreadsheet. Use the dropdown menu to assign the appropriate labels for the columns indicated

(Note: you do not need to do anything for the columns that say “No data found”

7. Click on “Start Import”. The next screen should confirm that your import has begun. Depending on how much data you’re importing, this could very from almost instantly to much longer before the import is completed.
